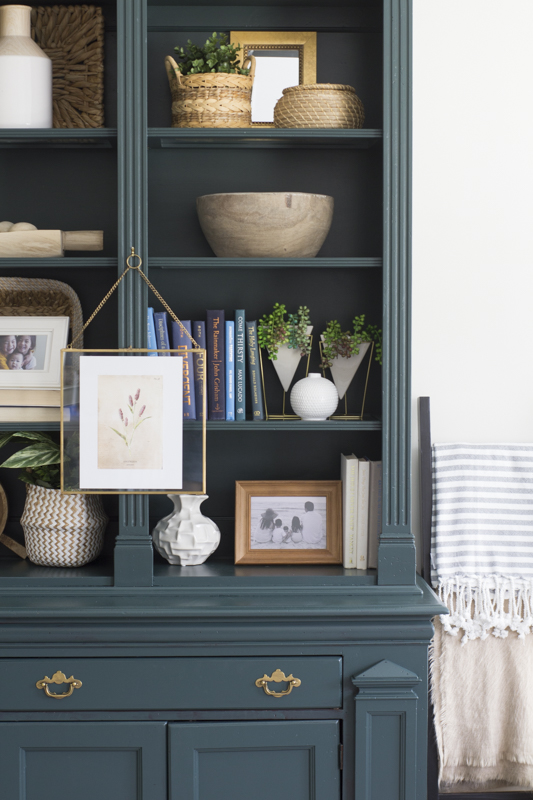
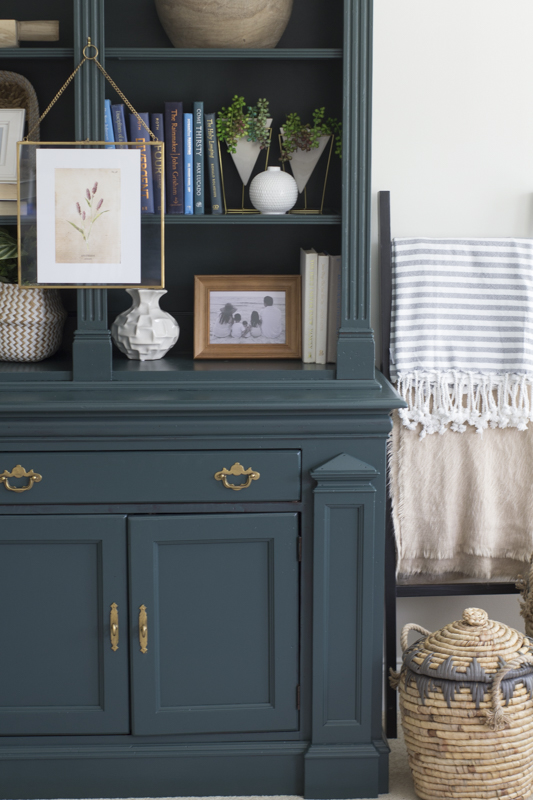
An impromptu room makeover and sharing how we painted our ugly beastly bookshelf.
Over the weekend, I completely redid our piano room. After sharing the process on my Instagram, I was flooded with questions on how we painted the bookshelf so I decided to write a blog post so I could just easily direct everyone here to save time. I’m going to preface this with saying that there are a number of ways to paint furniture. But this is how we painted our ugly beastly bookshelf.
This room is multi-functional in that it’s my office, sitting area, piano room and where a bunch of my overflow staging inventory lives. It’s the first room you see when you come through the front door and it was a major eye sore. I stuffed the huge bookshelf with random decor items and it just looked hoarderish and plain ugly. I hated the way it looked and needed to figure out another way to organize everything.
BEFORE
AFTER
Jimmy somehow scooted that gigantic bookshelf to the adjacent wall and I’m so much happier with this layout.
AGAIN, there are numerous ways to paint furniture. If you are painting kitchen cabinets, I recommend you going to this post and reading the tips on how we painted ours that way. You do not want to skip certain steps like sanding and priming when you paint kitchen cabinets. I have shared a bunch of projects on painting furniture with chalk paint and Velvet Finishes. You can check out those posts too as they give the furniture a different look and finish.
For this bookshelf, we skipped those steps because it isn’t really touched by anyone except me. The lower cabinets hold all of my office supplies and the shelves hold my overflow staging inventory. Please do not message me by saying this is not how you paint furniture. This is how I decided to paint it because to me sometimes, done is better than perfect. It’s also one of those pieces that I knew if I messed it up, it wasn’t a big deal.
All that to say, I’m super happy with the results. The paint looks absolutely beautiful and it has completely given it a fresh, modernized update to it’s once traditional appearance. This bookshelf probably weighs at least 800 lbs and I’m not even kidding. Taking it out to the garage for sanding and painting was not an option. The only way it even got in here was when we hired movers to bring it in 7 years ago when we purchased our home. I doubt it will ever leave this room.
I even thought about just wallpapering the back and leaving it. I didn’t love that option. I also planned on painting it a glossy black. Again, I didn’t love that option either.
Okay, let me get to the painting. It’s quite simple really! This is all we did.
Jimmy lifted up the bookshelf so I could get some paperbags underneath it. This was to protect the carpet. I rolled up the rug and Jules and I got to painting! Jules loves DIY and we spent the afternoon painting and chatting about middle school. It was really such a fun mother daughter time and I love that she wanted to spend time with me painting this beastly bookshelf. There’s nothing like quality time spent doing a DIY project together.
To prep the bookshelf, I cleaned and removed all the dust from it. I then used a liquid deglossing agent called Klean Strip Sander Deglosser. I used a cloth and wiped the bookshelf down with the deglosser. This takes a good bit of time but it’s important because it helps the paint stick to the wood. It does this by removing the glossy layer from the furniture. This stuff is strong so make sure you open up the windows and have a fan blowing.
After using the liquid sander, we got out our good brushes and started painting. Always use a good quality brush and you will barely notice any streaks. We applied the first coat of paint and made sure not to overdo it. After drying, we added one more coat and that was it! I like to use a small craft brush for the smaller nooks and crannies.
The only accident we had was when we got some paint on the walls but that was an easy clean up. I’m fine with any paint scratches or peels because it will be easy to do touch ups. To me, that was much easier than having to haul it outside, sand the whole thing down, prime and then paint.
The paint has done a wonderful job making it look new again. Paint usually takes a few weeks to completely cure but I will be styling it before since the shelves are mostly glass inserts. I’m just so happy it covers all the scratches and dings. The outside was in pretty poor shape and the satin sheen of the paint really brought it back to life.
Now for the paint color! It’s the same one I used in my master bathroom cabinets. It’s called Black Evergreen and it’s from Behr. I chose the satin sheen. This color is truly my favorite. It is the most beautiful dark green and I love how it changes with the light in this room. I love it so much in my bathroom and now I get to enjoy looking at it in my office. I also used Behr for the walls. I color matched it at Home Depot and the creamy white is Antique white by Porter.
If you are wanting to paint an old piece of furniture like this, would I recommend painting it like we did? It depends. If it doesn’t get a ton of use like cabinets, then yes! If it’s already an old piece and it can only get better not worse? Yes again! How about that special inherited antique from your grandma? Hmmm… maybe or maybe not. If you have never painted furniture before, I recommend doing a very small project first. Buy a cheap thrifted end table and practice on that first.
I used gold leaf rub n buff for the hardware. I would eventually like to change these out but for now, these will do. I didn’t want to spend any money on this project. The gold looks so so good against this moody green.
I hated this piece but needed it for it’s functionality but my goodness, I sure do love it now. That’s the beauty of paint. It can completely bring back to life any piece of furniture.
If it came out ugly, I knew I could just paint it another color. I just knew I had to do something.
It’s all styled and looking so pretty, don’t you think?
I’ll share the whole room makeover soon. I started painting it on a whim on Friday and then well, I just couldn’t stop. 
I printed some free vintage botanicals from here and I hung them up in these glass frames. I love the added dimension.
Here’s a final BEFORE and AFTER. You can also see the previous color left by the original builder. After 13 years, the paint was not just yellow but super dingy and scuffed up everywhere. Nothing that white paint can’t fix!
Thanks for reading, friends! I’d love to know what you think! Jules and I are smitten with this piece!
xoxo,
Let all that you do be done in Love. 1 Corinthians 16:14


