Here’s how I took our old dresser and transformed it into a modern black dresser.
When Jimmy and I first got married in 2003, we were so excited about so many things. Aside from the newness of marriage, we had just bought our first home together. I was so excited to decorate and furnish our new home together. We walked into a large furniture retail store and bought a complete living room, dining room, and bedroom set. The only thing we have kept since then is our bedroom furniture. Here’s how I took that same furniture and turned it into a modern black dresser for our bedroom.
This post is sponsored by Handy Products but all thoughts, styling, and opinions are my own.
Here is what our dresser looked like when we bought it 17 years ago. It was an ugly orangish oak color. The good thing is that it’s actually hardwood furniture so the quality is actually pretty decent. I got rid of the mirror a while ago.
This was the most modern-looking set we could find at the time so we went with it. This was long before I was passionate about interior design or had an idea of what I really loved.
About 6 years ago, I chalk painted it a creamy white and replaced it with acrylic hardware. I used to love the distressed look on furniture but my style has evolved quite a bit since then. I gravitate towards more of a combination between the traditional and modern.
Over time, many scratches and dings showed up on the dresser. Since it was white, it was easier to spot all the imperfections and the paint started to yellow over time. Chalk paint is great for a farmhouse or rustic look and I wanted to transform this piece to fit the rest of our room which has more of a transitional aesthetic. Transitional is when there’s a mesh of both traditional and modern elements to create a cohesive design.
This was the perfect time to give it another makeover thanks to my friends at Handy Products. Last month, I shared how Jimmy’s old desk received an update since he has an office in our bedroom. Their products make paint jobs so much easier. I love the clever ideas they use to help you make your DIY projects successful.
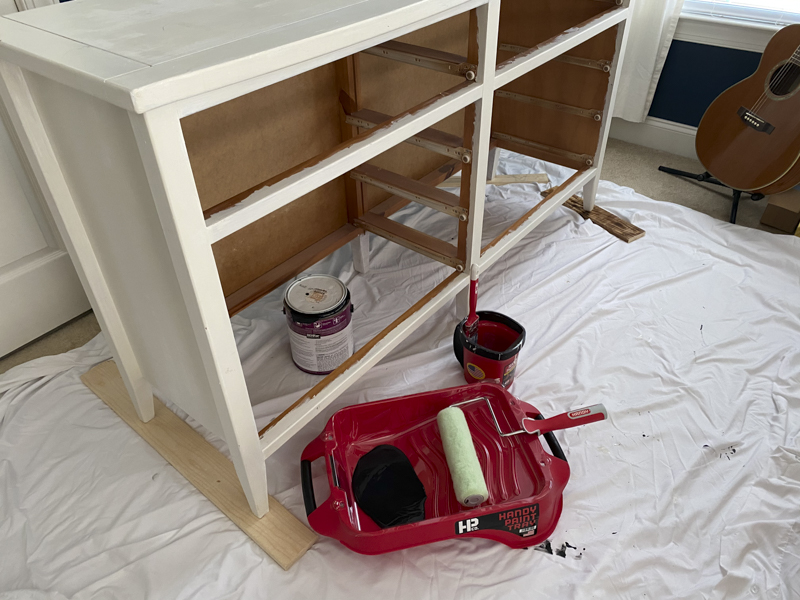
First things first, prep your workspace and lay down a tarp or something to protect your floors. Since I was doing this project in our bedroom, I made sure to protect the carpet.
I always prop the legs of the furniture with some scrap pieces of wood so that I can easily reach the bottom of the legs.
I removed all the drawers and wiped it down to clean off any debris or dust. Because I just painted Jimmy’s old desk black, I wanted to coordinate with that piece along with everything else in our bedroom. I decided on Carbon by Behr which is a rich black in a satin sheen.
The Handy Paint Tray along with the Handy Paint Liner was perfect for this project since I used the roller for the top, sides, and edges of the dresser. The roller makes for a smoother finish with a quicker process than a paintbrush.
After painting the base, I removed the old hardware and painted the shelves. I used the Handy Paint Pail Cover and was able to save the paint to use the next day. I used the paintbrush for all the areas that the roller couldn’t reach. To save your paintbrush, just cover it with plastic wrap and place it in the fridge. This prevents the paint from drying and you can finish painting the next day.
This is after one coat! The Handy Paint Pail is perfect to use when using a paintbrush. It has a comfortable handle so that you have a firm grip on the bucket AND it has a magnet on the edge of the bucket. This allows you to magnetically attach the paintbrush on the side instead of making it sit inside the paint at the bottom of the container.
Looking good!! Always wait until it’s completely dry before applying the second coat or you’ll risk having paint drips and weird paint lines.
Look how gorgeous! I recommend giving your furniture at least 3 coats of protective finish like polyurethane or polycrylic. This will make it easy to wipe down your furniture in the future as well as protect the paint finish for years to come.
I changed out the knobs for these marble ones from Hobby Lobby. The gold accent ties in with Jimmy’s desk.

The black is so clean and looks great against the navy walls. The navy paint is Sailor’s Coat by Olympic.
This is the wall where Jimmy’s office desk used to be. Now, his desk sits in front of our large trio of windows.
We are loving how this room is coming together! You can find the painted desk tutorial here.
It’s like a completely new piece of furniture again, right? It’s rich, moody, and oh-so chic.
No old furniture is safe around me! Instead of buying new, always look at that old piece of furniture because they always have the potential to be updated with just a little paint.
Thanks to my friends at Handy Products for helping to give my 17-year-old dresser a gorgeous update! It looks like she still has a lot of life left in her!
xoxo,
Let all that you do be done in Love. 1 Corinthians 16:14
This post contains affiliate links for your convenience.


