Homemade marshmallows are the most delicious things on earth and they are actually very easy to make.
Every year around Christmas time, we make homemade marshmallows. It’s a tradition we started years ago when my sister and I decided to make them one evening at her place. At the time, she had a kitchen aid mixer and we loved browsing blogs and pinterest for new recipes.

Judging by their appearance, I know it can seem really intimidating to make. Honestly, it’s a very simple, straightforward recipe. It’s so much better than the store bought ones and my kids get so happy when I make them around this time of year. My kids are huge, I mean huge hot chocolate fans. They ask for it every day. Some days after school, I’ll make them some hot cocoa and they love adding tons of marshmallows in them. The homemade marshmallows take the hot cocoa up a new level. The ingredients are very simple but you do have to have a kitchen aid mixer and a candy thermometer. I’m sure a meat thermometer could also work.
If you want to watch a detailed step by step video, you can watch that on my youtube channel. I’m a visual learner so it helps me to see how things are actually made.
Homemade Marshmallows
Ingredients:
- 3 packets of unflavored gelatin (in the jello section)
- 1 cup of ice water, divided
- 1/4 tsp salt
- 1 1/2 cups granulated sugar
- 1 tsp vanilla extract
- 1 cup of light corn syrup
- 1 cup of powdered sugar
- 1 cup of corn starch
- non stick spray
Directions:

In your kitchen aid mixer, pour 1/2 cup of the water into the bowl fitted with the whisk attachment. Sprinkle 3 packets of the gelatin on top of the water. Let sit while you prepare the sugar mixture.

In a small saucepan, pour 1 1/2 cups of granulated sugar, salt, corn syrup and remaining ice water. Cover and place under medium heat for around 3 minutes. Take the cover off and continue to cook for another 7-8 minutes without mixing. Place your candy thermometer and when the temperature reaches 240 degrees F, turn off heat.

Slowly pour in all of the hot sugar mixture into the gelatin. Use a spatula to get all the sugar mixture into the bowl. Place the mixer on the highest setting and let it mix for about 12-13 minutes. I use a cover in case it splashes. Be careful because it’s very hot!
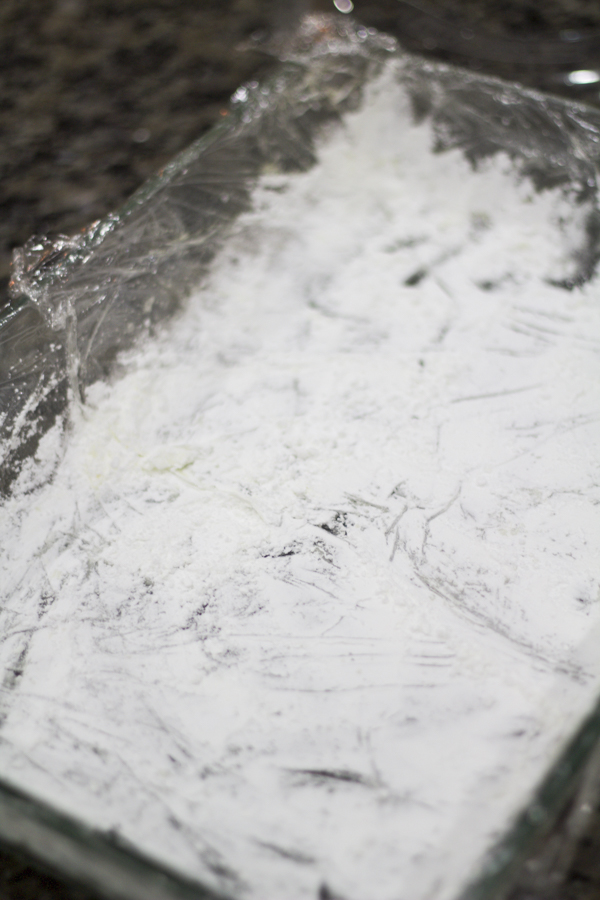
While that’s mixing, take a 9×13 size pan and line it with clear wrap. Spray all over the clear wrap. In a bowl, mix the corn starch and powdered sugar with a spoon. Sprinkle the corn starch and powdered mixture all on the bottom and sides of the pan. This will ensure the marshmallow to come out in one big block.
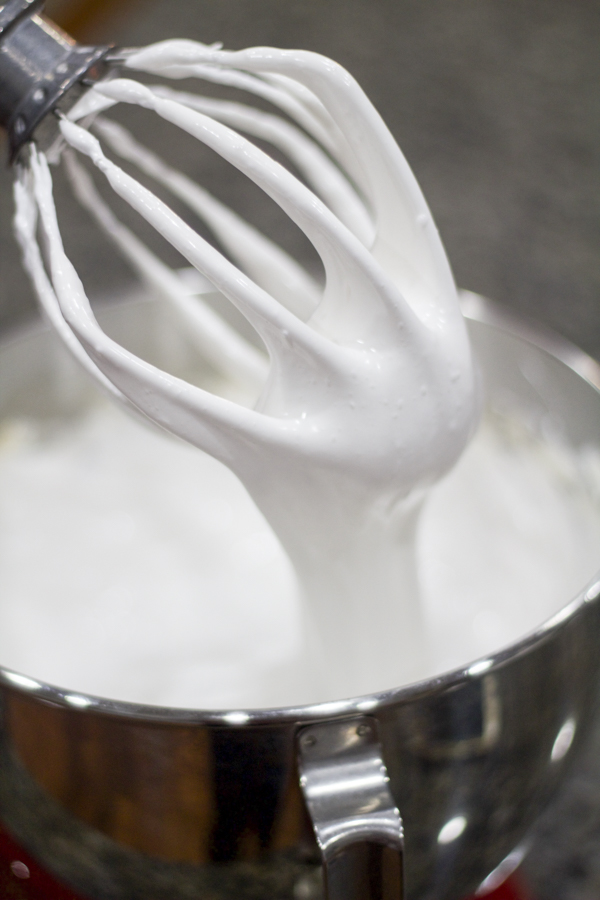
After 12-13 minutes of mixing, the mixture will be white and fluffy. Turn off your mixer and add the vanilla extract and mix on high for another 2 minutes.

With a spatula, pour the mixture into the pan and spread evenly. Take a bite because you won’t be able to help yourself.


Pour some of the corn starch/sugar mixture on top to lightly cover and leave some in a bowl to use again later. Leave the marshmallow uncovered for at least 4 hours. I usually let them sit overnight.


When ready, place the marshmallow on a cutting board. Cut them into squares and lightly pat the sticky sides into the remaining corn starch/powdered sugar mixture. Enjoy! Store the rest in a container and leave in a dry area like the pantry for up to 3 weeks.
It’s a true test of patience when you’re cutting these in front of your children.

Emmy: “How long is this woman gonna take?!” #yawn

Emmy: “This is torture. One more minute and that’s it.”

Me: “Hey Ems, I’m done! Want one?”
Emmy: “Umm… yeah!”

So soft, chewy, sweet, and fluffy!

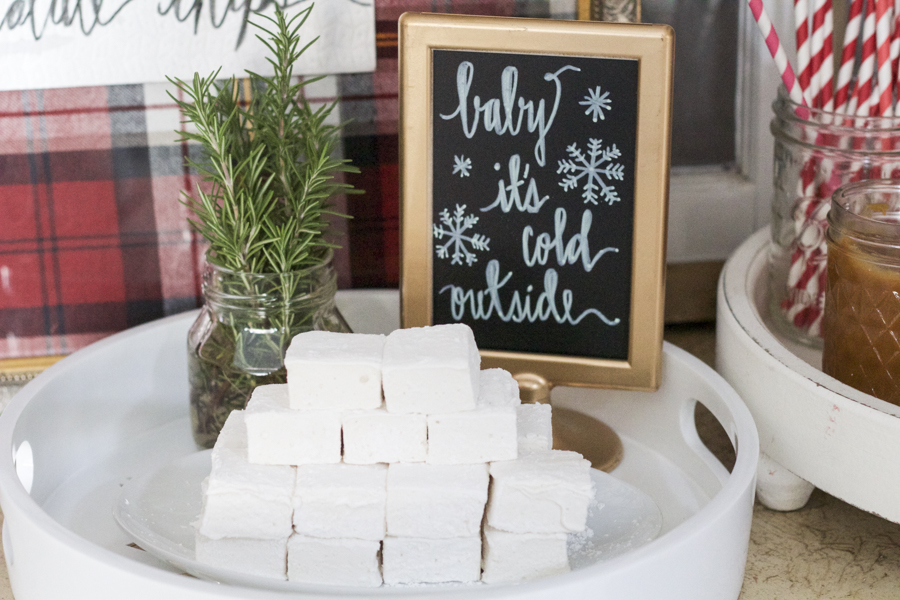
They’re good you guys. Real good. They are perfect for hot cocoa and even better in smores. These also make wonderful little host and neighbor gifts all packaged pretty in a box. Try them!


- 3 packets of unflavored gelatin (in the jello section)
- 1 cup of ice water, divided
- 1/4 tsp salt
- 1 1/2 cups granulated sugar
- 1 tsp vanilla extract
- 1 cup of light corn syrup
- 1 cup of powdered sugar
- 1 cup of corn starch
- non stick spray
- In your kitchen aid mixer, pour 1/2 cup of water into the bowl fitted with the whisk attachment. Sprinkle 3 packets of the gelatin on top of the water. Let sit.
- In a small saucepan, pour 1 1/2 cups of granulated sugar, salt, corn syrup and remaining ice water. Cover and place under medium heat for around 3 minutes. Take the cover off and continue to cook for another 7-8 minutes without mixing. Place your candy thermometer and when the temperature reaches 240 degrees F, turn off heat.
- Slowly pour in all of the hot sugar mixture into the gelatin. Use a spatula to get all the sugar mixture into the bowl. Place the mixer on the highest setting and let it mix for about 12-13 minutes.
- While that's mixing, take your 9x13 size pan and line it with clear wrap. Spray all over the clear wrap. In a bowl, mix the corn starch and powdered sugar with a spoon. Sprinkle the corn starch and powdered mixture all on the bottom and sides of the pan.
- After 12-13 minutes of mixing, the mixture will be white and fluffy. Turn off your mixer and add the vanilla extract and mix on high for another 2 minutes.
- With a spatula, pour the mixture into the pan and spread evenly.
- Pour some of the corn starch/sugar mixture on top to lightly cover and leave some in a bowl to use again later. Leave the marshmallow uncovered for at least 4 hours. I usually let them sit overnight.
- When ready, place the marshmallow on a cutting board. Cut them into squares and lightly pat the sticky sides into the remaining corn starch/powdered sugar mixture. Enjoy! Store the rest in a container and leave in a dry area like the pantry for up to 3 weeks.
xoxo
yuni
Let all that you do be done in Love. 1 Corinthians 16:14
I’m a fan of your blog but am disappointed to see that this blog post contains the same content and photos from a post I remember from last year – there’s no shame in re-posting as long as you are disclosing it!
Hi there!! First of all, thank you so much for being a super fan and noticing that yes this was an older post! I think it’s actually 2 years old because my Emmy is so little. I added an instructional step by step video to this post along with a couple new pics. I bumped it up on the timeline so that my readers could easily find the detailed video since I’m sharing it on my social media posts. I’ll be doing this with some older posts since I’m now creating video content and hoping that this will help my readers especially if they are visual learners like myself. Thanks for reading again and happy holidays to you!